> ## Documentation Index
> Fetch the complete documentation index at: https://sequinstream.com/docs/llms.txt
> Use this file to discover all available pages before exploring further.
# Transactionally start a Temporal workflow when data changes in your database
> Learn how to use Sequin to trigger a Temporal workflow when data changes in your database. Ensure consistency across services and build complex, transactionally-consistent workflows.
[Temporal](https://temporal.io/) is a workflow engine that reliably runs long-running business processes. Often, you need to guarantee consistency between business processes executed by Temporal and your database. For instance, no matter what service modifies the data in your database, you want to ensure a workflow is executed to process the change. That is, you need a transactionally-consistent workflow.
In this tutorial, you'll learn how to transactionally trigger a Temporal workflow using Sequin. No need to hand rebuild an outbox pattern or pull in complex dependencies like Kafka or RabbitMQ.
As a common example, you'll trigger a workflow to ensure a user is deleted across multiple services as soon as the user is removed from the database. Sequin will give you a set of guarantees that ensure the workflow is always triggered, then Temporal will give you a set of guarantees that ensure the workflow executes.
## Prerequisites
You'll create a Sequin Webhook Sink that'll deliver a webhook to a Node.js worker whenever a user is deleted in your database. You'll need the following:
* Sequin [installed and running locally](/running-sequin)
* A Postgres database [connected to Sequin](/connect-postgres)
* A working understanding of Temporal's TypeScript SDK - including [Workflows](https://docs.temporal.io/develop/typescript/message-passing) and Workers
* Node.js [installed](https://nodejs.org/en/download) on your machine (if you want to [run the code examples](https://github.com/sequinstream/sequin/tree/main/examples/sequin-cdc-to-temporal))
## Setup your database tables
Start by creating a mock users table. In the Postgres database connected to Sequin, run the following SQL:
```sql theme={null}
-- Create a users table
create table users (
id uuid primary key default gen_random_uuid (),
first_name text not null,
last_name text not null,
email text not null unique,
created_at timestamptz default now(),
updated_at timestamptz default now()
);
-- Insert some mock data
insert into
users (first_name, last_name, email)
values
('John', 'Doe', 'john.doe@example.com'),
('Jane', 'Smith', 'jane.smith@example.com'),
('Alice', 'Johnson', 'alice.johnson@example.com'),
('Bob', 'Brown', 'bob.brown@example.com'),
('Charlie', 'Davis', 'charlie.davis@example.com'),
('Emily', 'Wilson', 'emily.wilson@example.com'),
('Frank', 'Miller', 'frank.miller@example.com'),
('Grace', 'Moore', 'grace.moore@example.com'),
('Hannah', 'Taylor', 'hannah.taylor@example.com'),
('Isaac', 'Anderson', 'isaac.anderson@example.com');
-- Capture changes to the users table
alter table users replica identity full;
```
## Setup a Webhook Sink in Sequin
Now, you'll setup a Sequin Webhook Sink that'll deliver a webhook to a Node.js worker whenever a user is deleted in your database.
In the Sequin console, navigate to the [**Sink**](https://localhost:7376/sinks) page and click "Create Sink". Then, select "Webhook" as the sink type.
Select the `users` table you created in the previous step as the source table.
In the "Filter" section, add a filter to ensure the webhook is only delivered when a user is deleted by turning on the "Delete" filter, and turning off the "Insert" and "Update" filters.
Skip down to the "HTTP Endpoint" section, click "New HTTP Endpoint" and in the new window, name the endpoint (e.g. `temporal-worker`) and enter the following url:
```
http://localhost:3333/
```
No need to add any headers or authentication right now. Then, go back to your Webhook Sink form, refresh the list of endpoints, and select the `temporal-worker` endpoint you just created. As a last step, add the following path to the endpoint:
```
/delete-user
```
The fully qualified endpoint is now: `http://localhost:3333/delete-user`
Give your webhook sink a name (e.g. `temporal-webhook-sink`) and click "Save" to save the webhook sink.
Sequin is now watching for deletes on the `users` table and will deliver a webhook to `http://localhost:3333/delete-user` whenever a user is deleted.
## Scaffold a TypeScript Temporal Worker
With Sequin setup and ready to deliver webhooks, you can now scaffold a TypeScript Temporal Worker.
Temporal provides a handy [CLI tool](https://learn.temporal.io/getting_started/typescript/hello_world_in_typescript/#create-a-new-temporal-typescript-project) to scaffold a new worker project. Run the following command to create a new worker project:
```
npx @temporalio/create --sample empty sequin-cdc-to-temporal
```
This will create a new directory called `sequin-cdc-to-temporal` with a basic Temporal worker project:
```
├── README.md
├── node_modules
├── package-lock.json
├── package.json
├── src
│ ├── activities.ts
│ ├── client.ts
│ ├── mocha
│ ├── shared.ts
│ ├── worker.ts
│ └── workflows.ts
└── tsconfig.json
```
Add a HTTP server to this project by adding a `src/server.ts` file and installing the express package:
```
touch src/server.ts
npm install express --save
```
Now, in a terminal start the Temporal server:
```
temporal server start-dev --db-filename your_temporal.db
```
The Temporal server is now running and your project is ready for a workflow and worker to be added.
## Create the Temporal Workflow
In this scenario, when you delete a user, you want to trigger a Temporal workflow to delete the user across multiple services and then send the user a confirmation email. In temporal you'll define 3 things to achieve this:
1. Activities that define the individual tasks to be performed.
2. A workflow that orchestrates the activities.
3. A worker that will run the Temporal workflow when the Temporal task queue receives a task.
Finally, you'll define the HTTP server to receive the webhook from Sequin and send the signal to the Temporal server to start the workflow.
### Define the delete user activities
In Temporal, activities are the individual tasks that make up a workflow. Define two activities in the `src/activities.ts` file with the following code:
```js activities.ts theme={null}
export async function cleanUpExternalSystems(userId: string): Promise {
console.log(`[*] Performing external cleanup for user ${userId}...`);
// Simulated delay to represent real API calls
await new Promise(resolve => setTimeout(resolve, 1000));
}
export async function sendDeletionConfirmation(email: string): Promise {
console.log(`[*] Sending account deletion confirmation to ${email}...`);
// Simulated delay to represent sending a real notification
await new Promise(resolve => setTimeout(resolve, 500));
}
```
The first `cleanUpExternalSystems` activity simulates the cleanup of a user's data in external systems by delaying for 1 second. The second `sendDeletionConfirmation` activity simulates sending a confirmation email by delaying for 500 milliseconds.
Of course, in a real application, these activities would be replaced with the actual logic to clean up the user's data and send the confirmation email. The power of Temporal is that even if these activities take hours, fail, or are interrupted, Temporal will ensure the workflow is retried and completed.
### Orchestrate the activities in a workflow
Now, you'll orchestrate the activities in a workflow. Define a workflow in the `src/workflows.ts` file with the following code:
```js workflows.ts theme={null}
import { defineSignal, condition, proxyActivities, setHandler } from '@temporalio/workflow';
import * as activities from './activities';
// Configure activities for use in the Workflow
const { cleanUpExternalSystems, sendDeletionConfirmation } = proxyActivities({
startToCloseTimeout: '1 minute',
retry: { maximumAttempts: 5 }
});
export const userDeletedSignal = defineSignal<[string, string]>('userDeleted');
export async function userDeletionCleanupWorkflow(): Promise {
let done = false;
// Signal handler runs inside workflow lock – fully deterministic
setHandler(userDeletedSignal, async (userId: string, email: string) => {
await cleanUpExternalSystems(userId);
await sendDeletionConfirmation(email);
done = true;
});
// Park the workflow until the signal arrives
await condition(() => done);
}
```
Here, you are defining a long-lived workflow that does nothing until it receives a `userDeletedSignal` (that'll be triggered by the webhook from Sequin). It then runs the two activities and completes. Importantly, the workflow also defines how to handle and retry failed activities - in this case, the workflow will retry the activities up to 5 times.
Using a long-lived workflow triggered by a signal builds on the [suggested architecture from Temporal](https://community.temporal.io/t/using-external-db-events-to-drive-workflows-in-temporal/13363/2). You could just as easily build a workflow that starts each time a webhook is received and completes after the activities are run.
### Define the worker to run the workflow
With your workflow defined, setup a worker to listen to the Temporal task queue and run the workflow.
First, in the `src/shared.ts` file, define a constant for the task queue name:
```js shared.ts theme={null}
export const TASK_QUEUE_NAME = "user-deletion-workflow-queue";
```
Now, in the `src/worker.ts` file, define the worker:
```js worker.ts theme={null}
import { Worker } from '@temporalio/worker';
import * as activities from './activities';
import { TASK_QUEUE_NAME } from './shared';
async function runWorker() {
// Create a worker that connects to the Temporal server
const worker = await Worker.create({
// Path to the module containing our workflow definitions
workflowsPath: require.resolve('./workflows'),
// Register all exported activities for execution
activities,
// The task queue this worker will poll for work
taskQueue: TASK_QUEUE_NAME
});
console.log(`Worker started for task queue: ${TASK_QUEUE_NAME}`);
// Start polling for and processing workflow tasks
await worker.run();
}
// Start the worker and handle any errors
runWorker().catch((err) => {
console.error('Worker failed: ', err);
process.exit(1);
});
```
This worker will poll the Temporal server for tasks and execute the workflow when a task is received.
### Define the HTTP server to receive the webhook
Finally, define the HTTP server to receive the webhook from Sequin and send the signal to the workflow when a user is deleted. In the `src/server.ts` file, define the server with the following code:
```js server.ts theme={null}
import { Connection, Client } from '@temporalio/client';
import { userDeletionCleanupWorkflow, userDeletedSignal } from './workflows';
import express, { Request, Response, RequestHandler } from 'express';
import { TASK_QUEUE_NAME } from './shared';
const app = express();
const PORT = process.env.PORT || 3333;
app.use(express.json()); // parse JSON request bodies
app.get('/', (_req, res) => {
res.send('Sequin-Temporal Webhook Receiver is running');
});
let client: Client;
async function setupTemporal() {
const connection = await Connection.connect();
client = new Client({ connection });
}
const webhookHandler: RequestHandler = async (req: Request, res: Response): Promise => {
const { data } = req.body || {};
if (!Array.isArray(data)) {
res.status(400).send('Bad request');
return;
}
try {
for (const change of data) {
if (
change.action === 'delete' &&
change.metadata?.table_name === 'users'
) {
const { id: userId, email } = change.record;
const workflowId = `user-delete-${userId}`;
await client.workflow.signalWithStart(userDeletionCleanupWorkflow, {
workflowId,
taskQueue: TASK_QUEUE_NAME,
args: [], // workflow takes no start args
signal: userDeletedSignal,
signalArgs: [userId, email]
});
console.log(`Signalled (or started) workflow ${workflowId}`);
}
}
res.sendStatus(200); // acknowledge Sequin
} catch (err) {
console.error(err);
res.sendStatus(500); // Sequin will retry
}
};
app.post('/delete-user', webhookHandler);
setupTemporal().then(() => {
app.listen(PORT, () => console.log(`Webhook listener started on port ${PORT}`));
});
```
On boot, the server starts a Temporal client connection. It then defines the `/delete-user` endpoint that Sequin will deliver the webhook to. When the endpoint is called, it triggers the Temporal workflow with a `signalWithStart` call.
Your temporal workflow is now defined and will be trigged whenever a webhook is delivered from Sequin.
## Run the application
Now, you're ready to run the application. Make sure the Temporal servers is still running:
```bash theme={null}
temporal server start-dev --db-filename your_temporal.db
```
In a new terminal, start the Temporal worker:
```
npm start
```
And in another terminal, start the HTTP server:
```
npx ts-node src/server.ts
```
Now, delete a user from the database:
```sql theme={null}
delete from users where first_name = 'John';
```
Tracing the chain of events:
Sequin captures the delete event from the database and delivers a webhook to the HTTP server:
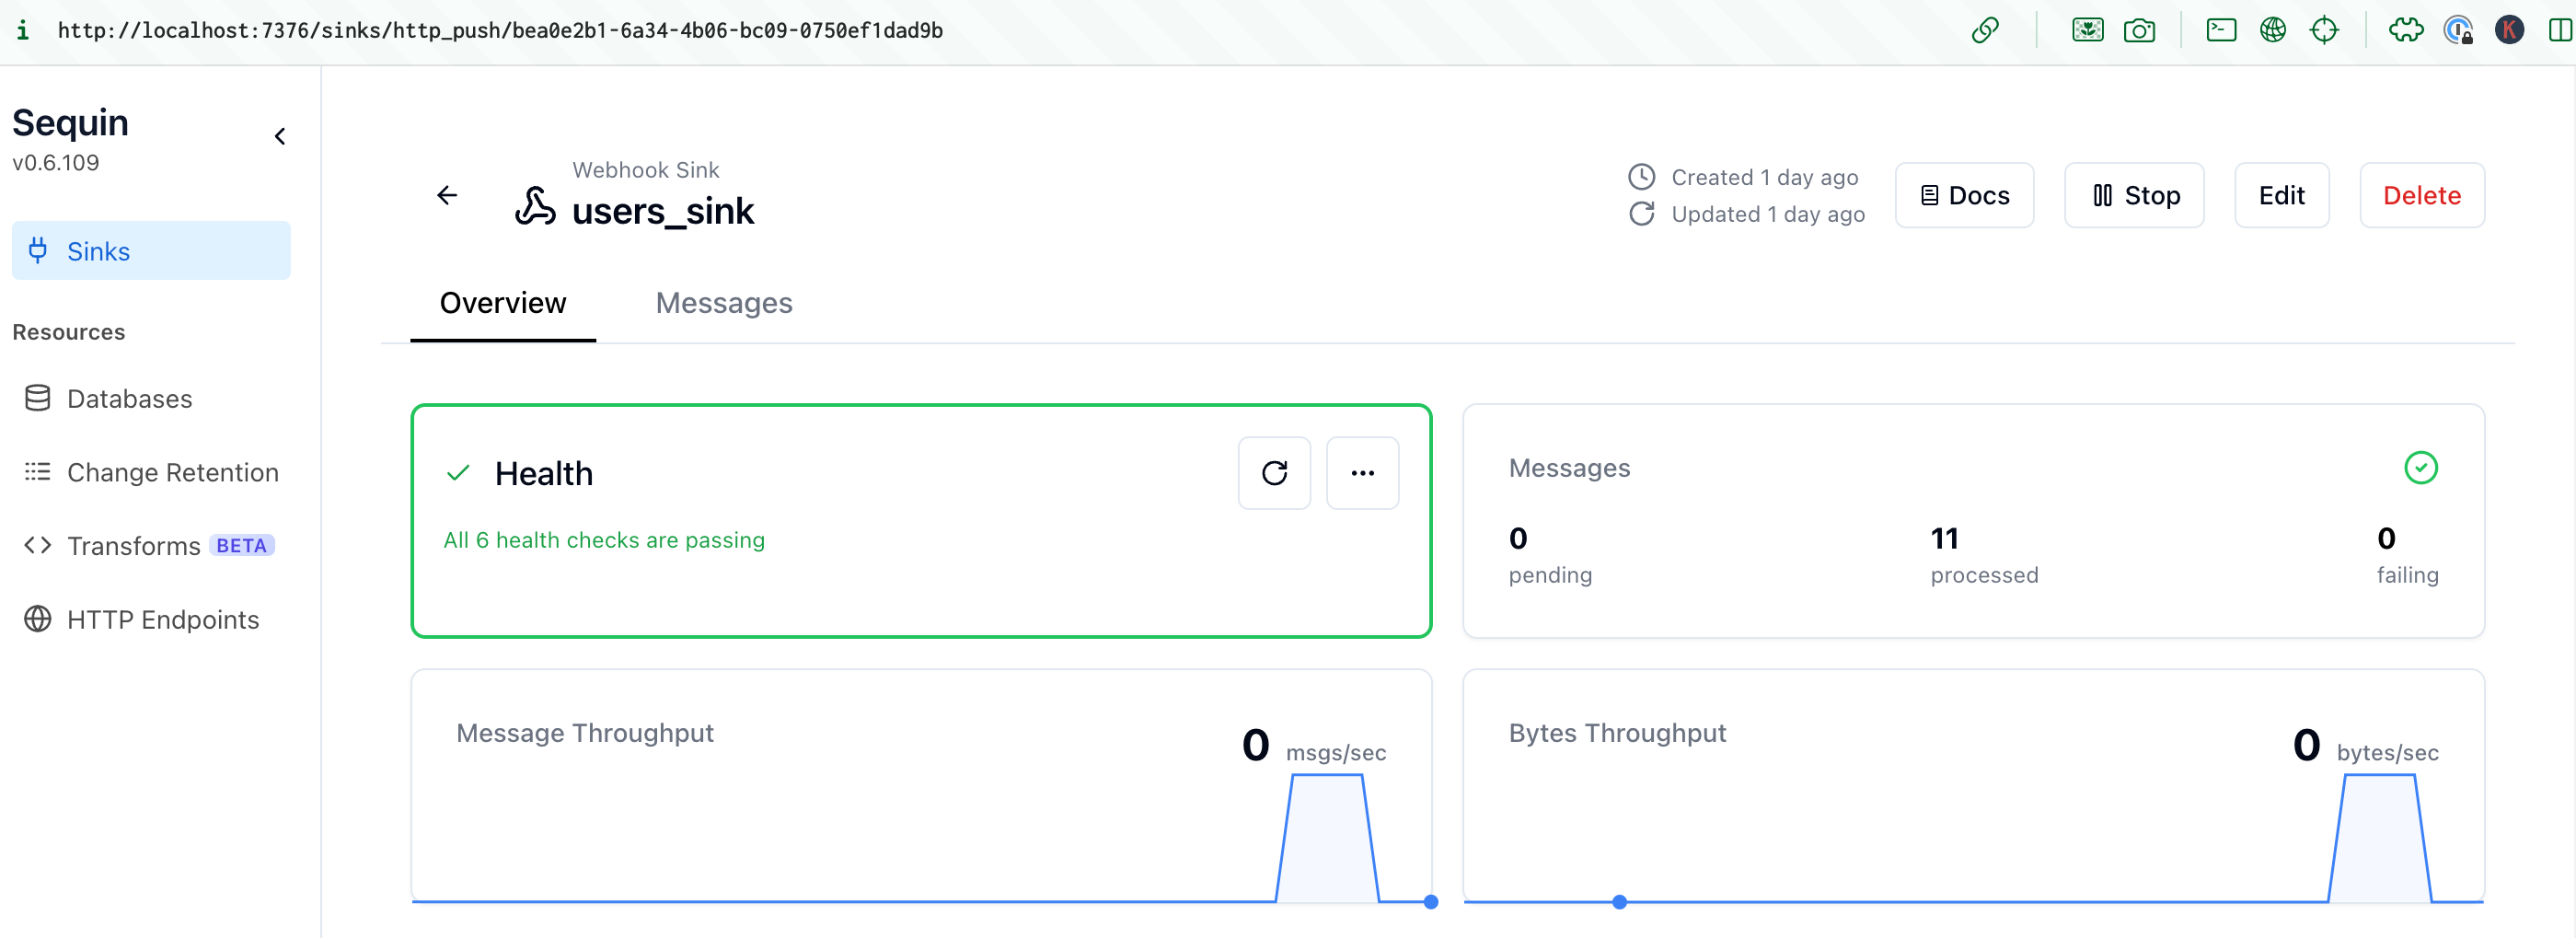 The HTTP server triggers the Temporal workflow with a `signalWithStart` call:
```bash theme={null}
Signalled (or started) workflow user-delete-20f5cc55-b218-4aad-8fa7-ef7556575776
```
The Temporal workflow starts and runs the `cleanUpExternalSystems` and `sendDeletionConfirmation` activities:
```bash theme={null}
[*] Performing external cleanup for user 20f5cc55-b218-4aad-8fa7-ef7556575776...
[*] Sending account deletion confirmation to john.doe@example.com...
```
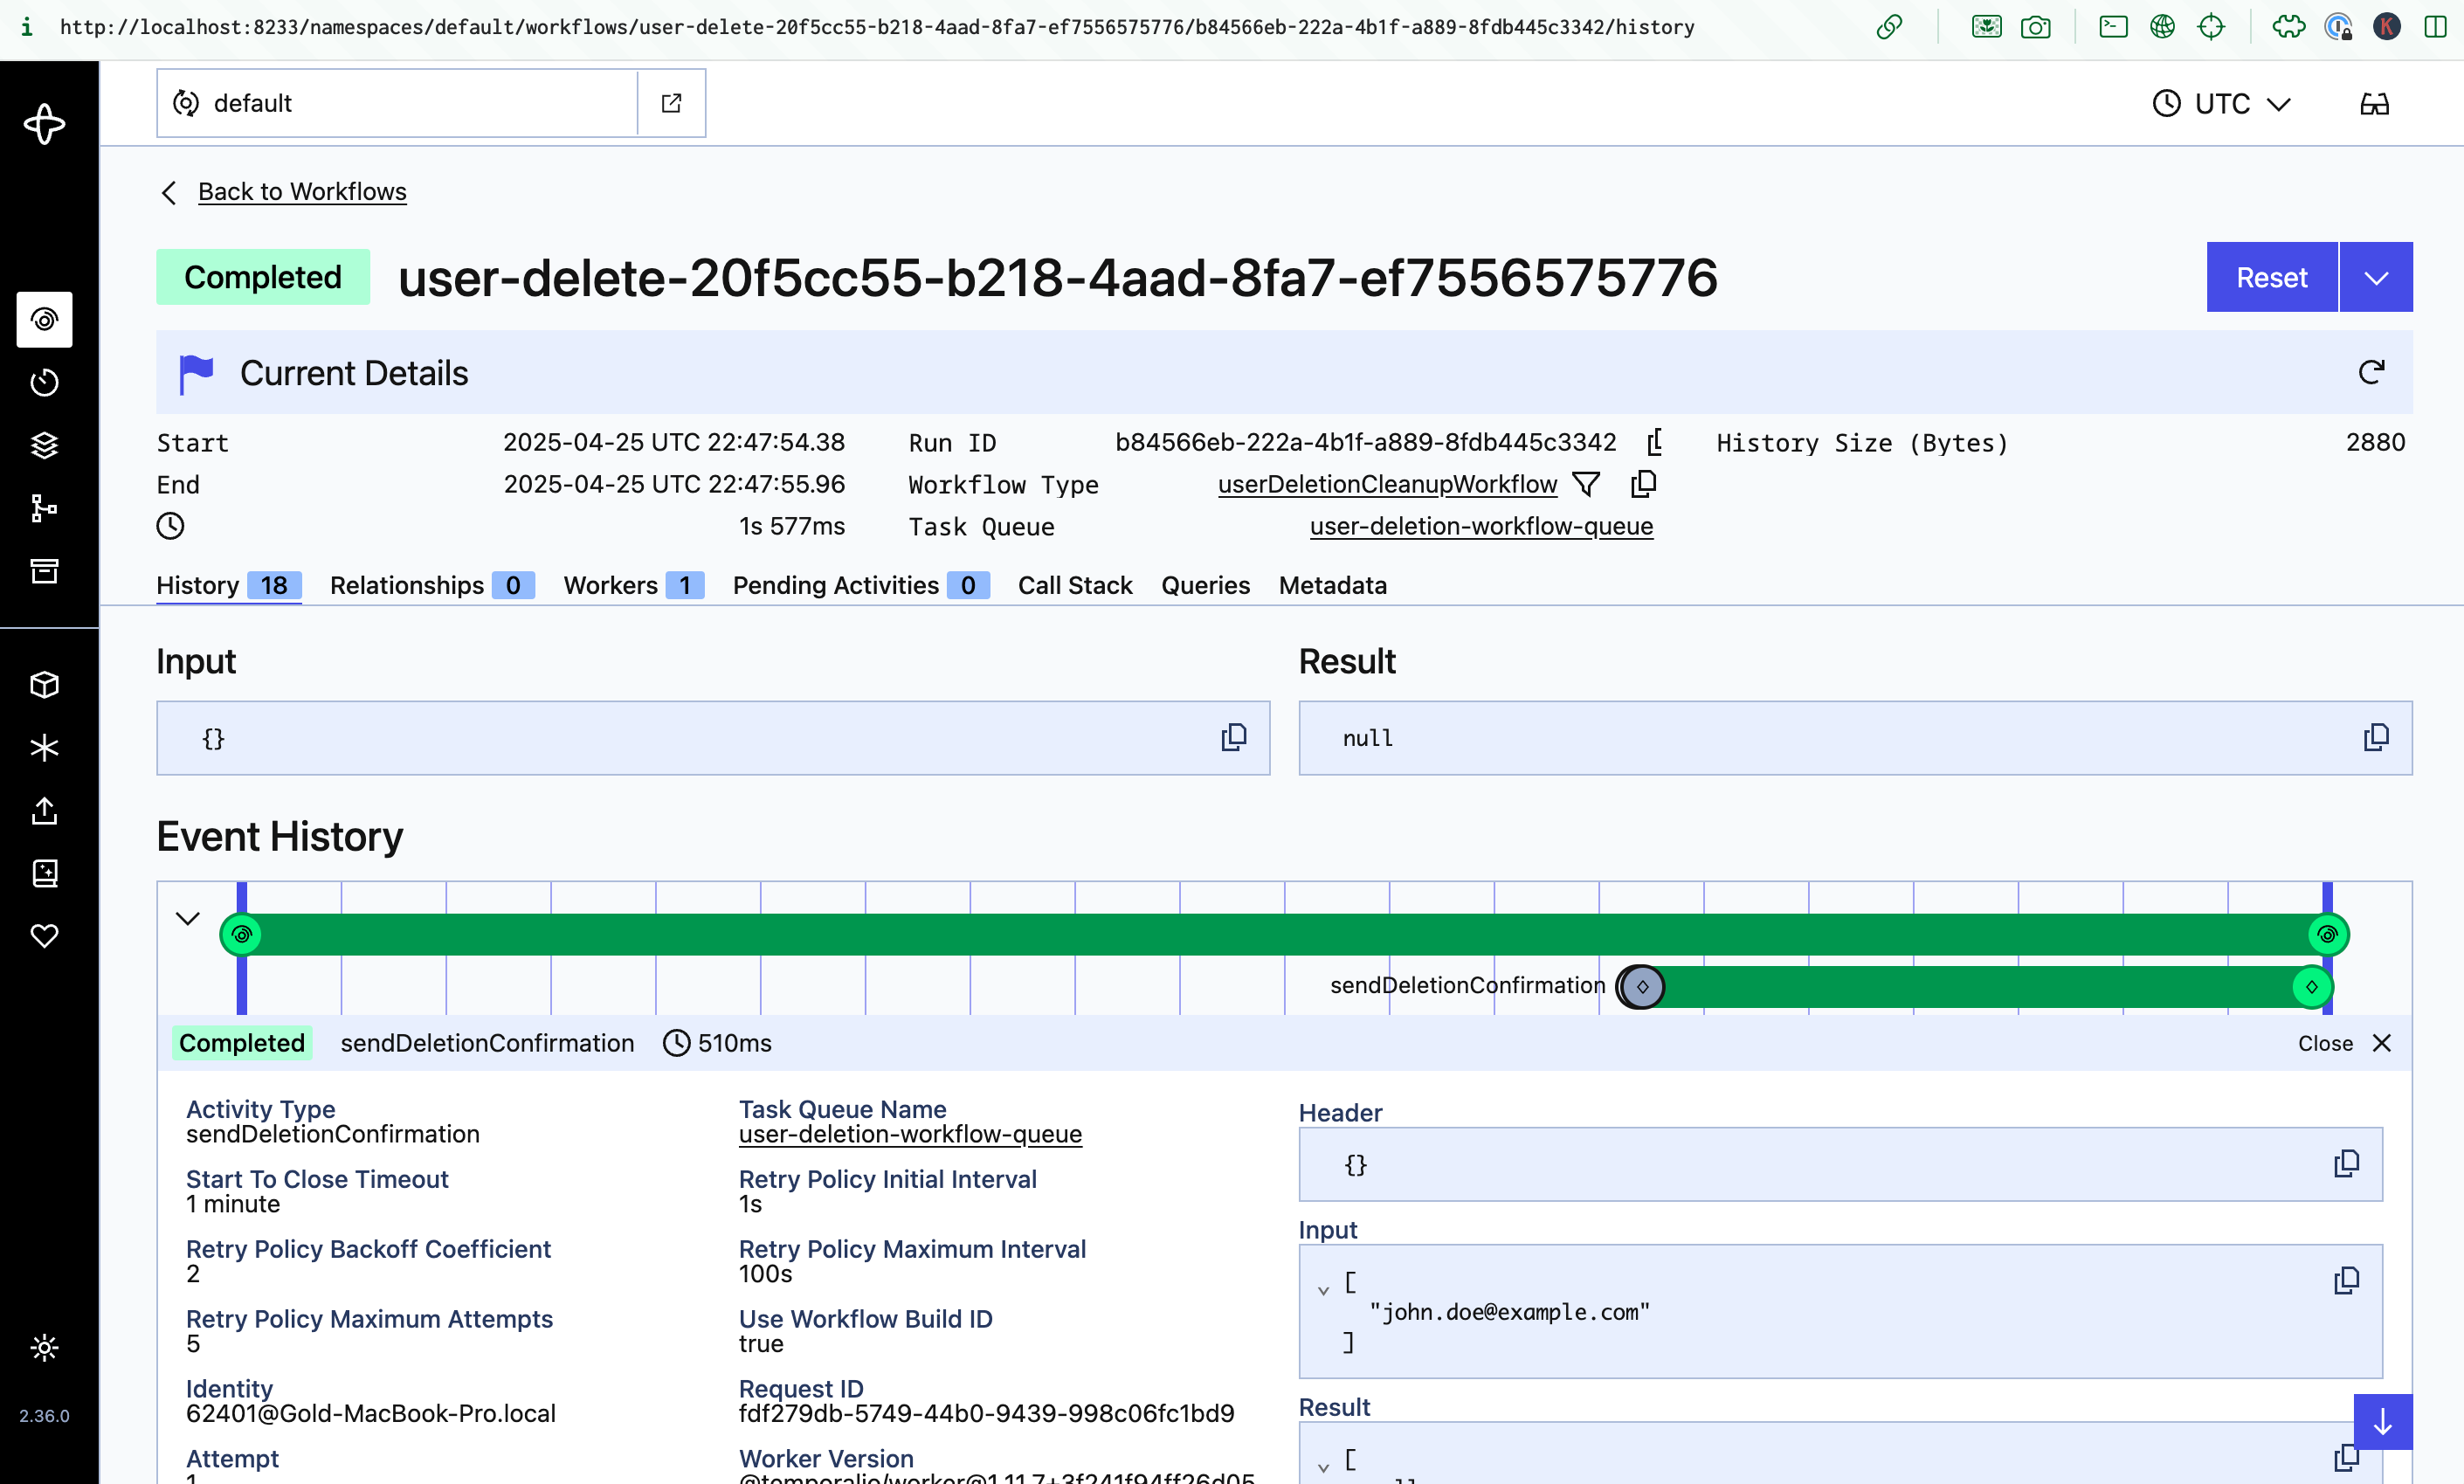
The activities complete and the workflow completes. You can see the workflow complete in the Temporal UI:
The HTTP server triggers the Temporal workflow with a `signalWithStart` call:
```bash theme={null}
Signalled (or started) workflow user-delete-20f5cc55-b218-4aad-8fa7-ef7556575776
```
The Temporal workflow starts and runs the `cleanUpExternalSystems` and `sendDeletionConfirmation` activities:
```bash theme={null}
[*] Performing external cleanup for user 20f5cc55-b218-4aad-8fa7-ef7556575776...
[*] Sending account deletion confirmation to john.doe@example.com...
```
The activities complete and the workflow completes. You can see the workflow complete in the Temporal UI:
 Every time a user is deleted in the database - no matter what service performs the delete - a Temporal workflow is triggered to delete the user across multiple services and then send the user a confirmation email.
## Resources
The combination of Sequin and Temporal provides a powerful way to build complex, transactionally-consistent workflow. Together, you can be sure that changes in your database are always reflected across your application and services.
To build on this example, dig into the following resources:
Learn how to connect your production database to Sequin.
Learn how to deploy Sequin in production.
Learn more about how to configure your webhook sinks to deliver messages to your users.
Learn about all the configuration options available in sequin.yaml.
Learn how to monitor your system with Sequin's built-in metrics.
Every time a user is deleted in the database - no matter what service performs the delete - a Temporal workflow is triggered to delete the user across multiple services and then send the user a confirmation email.
## Resources
The combination of Sequin and Temporal provides a powerful way to build complex, transactionally-consistent workflow. Together, you can be sure that changes in your database are always reflected across your application and services.
To build on this example, dig into the following resources:
Learn how to connect your production database to Sequin.
Learn how to deploy Sequin in production.
Learn more about how to configure your webhook sinks to deliver messages to your users.
Learn about all the configuration options available in sequin.yaml.
Learn how to monitor your system with Sequin's built-in metrics.