> ## Documentation Index
> Fetch the complete documentation index at: https://sequinstream.com/docs/llms.txt
> Use this file to discover all available pages before exploring further.
# Trigger Trigger.dev tasks from database changes
> Build AI-powered applications with Trigger.dev and Postgres change data capture (CDC). Learn how to automatically create embeddings when database records change.
[Trigger.dev](https://trigger.dev) makes it easy to write and run long-running tasks. You write and test tasks locally in your project, and then deploy them to Trigger.dev where they reliably invoke the tasks. Trigger.dev handles the infrastructure, observability, and execution.
Often, you want to trigger a task when a record in your database is created, updated, or deleted. For instance, you might want to use a Trigger.dev task to generate an embedding for each new post in your database:
 In this guide, you'll learn how to use Sequin to trigger Trigger.dev tasks from database changes.
## Prerequisites
You are about to create a [regular Trigger.dev task](https://trigger.dev/docs/tasks-regular) that you will execute when ever a post is inserted or updated in your database. Sequin will detect all the changes on the `posts` table and then send the payload of the post to an API endpoint that will call `tasks.trigger()` to create the embedding and update the database.
As long as you create an HTTP endpoint that Sequin can deliver webhooks to, you can use any web framework or edge function (e.g. Supabase Edge Functions, Vercel Functions, Cloudflare Workers, etc.) to invoke your Trigger.dev task. In this guide, we'll show you how to setup Trigger.dev tasks using Next.js API Routes.
You'll need the following to follow this guide:
* A Next.js project with [Trigger.dev](https://trigger.dev) installed
If you don't have one already, follow [Trigger.dev's Next.js setup guide](https://trigger.dev/docs/guides/frameworks/nextjs) to setup your project. You can return to this guide when you're ready to write your first Trigger.dev task.
* Sequin [installed locally](/docs/quickstart/webhooks)
* A [database](/docs/connect-postgres) connected to Sequin
## Create a Trigger.dev task
Start by creating a new Trigger.dev task that takes in a Sequin webhook sink [payload](/docs/reference/sinks/webhooks#request-format), creates an embedding, and then inserts the embedding into the database:
In your `src/trigger/tasks` directory, create a new file called `create-embedding-for-post.ts` and add the following code:
```ts trigger/create-embedding-for-post.ts theme={null}
import { task } from "@trigger.dev/sdk/v3";
import { OpenAI } from "openai";
import { upsertEmbedding } from "../util";
const openai = new OpenAI({
apiKey: process.env.OPENAI_API_KEY,
});
export const createEmbeddingForPost = task({
id: "create-embedding-for-post",
run: async (payload: {
record: {
id: number;
title: string;
body: string;
author: string;
createdAt: string;
embedding: string | null;
},
metadata: {
table_schema: string,
table_name: string,
consumer: {
id: string;
name: string;
};
};
}) => {
// Create an embedding using the title and body of payload.record
const content = `${payload.record.title}\n\n${payload.record.body}`;
const embedding = (await openai.embeddings.create({
model: "text-embedding-ada-002",
input: content,
})).data[0].embedding;
// Upsert the embedding in the database. See utils.ts for the implementation -> ->
await upsertEmbedding(embedding, payload.record.id);
// Return the updated record
return {
...payload.record,
embedding: JSON.stringify(embedding),
};
}
});
```
```ts utils.ts theme={null}
import pg from "pg";
export async function upsertEmbedding(embedding: number[], id: number) {
const client = new pg.Client({
connectionString: process.env.DATABASE_URL,
});
await client.connect();
try {
const query = `
INSERT INTO post_embeddings (id, embedding)
VALUES ($2, $1)
ON CONFLICT (id)
DO UPDATE SET embedding = $1
`;
const values = [JSON.stringify(embedding), id];
const result = await client.query(query, values);
console.log(`Updated record in database. Rows affected: ${result.rowCount}`);
return result.rowCount;
} catch (error) {
console.error("Error updating record in database:", error);
throw error;
} finally {
await client.end();
}
}
```
This task takes in a Sequin record, creates an embedding, and then uppserts the embedding into a `post_embeddings` table.
Register the `create-embedding-for-post` task to your Trigger.dev cloud project by running the following command:
```bash theme={null}
npx trigger.dev@latest dev
```
In the Trigger.dev dashboard, you should now see the `create-embedding-for-post` task:
In this guide, you'll learn how to use Sequin to trigger Trigger.dev tasks from database changes.
## Prerequisites
You are about to create a [regular Trigger.dev task](https://trigger.dev/docs/tasks-regular) that you will execute when ever a post is inserted or updated in your database. Sequin will detect all the changes on the `posts` table and then send the payload of the post to an API endpoint that will call `tasks.trigger()` to create the embedding and update the database.
As long as you create an HTTP endpoint that Sequin can deliver webhooks to, you can use any web framework or edge function (e.g. Supabase Edge Functions, Vercel Functions, Cloudflare Workers, etc.) to invoke your Trigger.dev task. In this guide, we'll show you how to setup Trigger.dev tasks using Next.js API Routes.
You'll need the following to follow this guide:
* A Next.js project with [Trigger.dev](https://trigger.dev) installed
If you don't have one already, follow [Trigger.dev's Next.js setup guide](https://trigger.dev/docs/guides/frameworks/nextjs) to setup your project. You can return to this guide when you're ready to write your first Trigger.dev task.
* Sequin [installed locally](/docs/quickstart/webhooks)
* A [database](/docs/connect-postgres) connected to Sequin
## Create a Trigger.dev task
Start by creating a new Trigger.dev task that takes in a Sequin webhook sink [payload](/docs/reference/sinks/webhooks#request-format), creates an embedding, and then inserts the embedding into the database:
In your `src/trigger/tasks` directory, create a new file called `create-embedding-for-post.ts` and add the following code:
```ts trigger/create-embedding-for-post.ts theme={null}
import { task } from "@trigger.dev/sdk/v3";
import { OpenAI } from "openai";
import { upsertEmbedding } from "../util";
const openai = new OpenAI({
apiKey: process.env.OPENAI_API_KEY,
});
export const createEmbeddingForPost = task({
id: "create-embedding-for-post",
run: async (payload: {
record: {
id: number;
title: string;
body: string;
author: string;
createdAt: string;
embedding: string | null;
},
metadata: {
table_schema: string,
table_name: string,
consumer: {
id: string;
name: string;
};
};
}) => {
// Create an embedding using the title and body of payload.record
const content = `${payload.record.title}\n\n${payload.record.body}`;
const embedding = (await openai.embeddings.create({
model: "text-embedding-ada-002",
input: content,
})).data[0].embedding;
// Upsert the embedding in the database. See utils.ts for the implementation -> ->
await upsertEmbedding(embedding, payload.record.id);
// Return the updated record
return {
...payload.record,
embedding: JSON.stringify(embedding),
};
}
});
```
```ts utils.ts theme={null}
import pg from "pg";
export async function upsertEmbedding(embedding: number[], id: number) {
const client = new pg.Client({
connectionString: process.env.DATABASE_URL,
});
await client.connect();
try {
const query = `
INSERT INTO post_embeddings (id, embedding)
VALUES ($2, $1)
ON CONFLICT (id)
DO UPDATE SET embedding = $1
`;
const values = [JSON.stringify(embedding), id];
const result = await client.query(query, values);
console.log(`Updated record in database. Rows affected: ${result.rowCount}`);
return result.rowCount;
} catch (error) {
console.error("Error updating record in database:", error);
throw error;
} finally {
await client.end();
}
}
```
This task takes in a Sequin record, creates an embedding, and then uppserts the embedding into a `post_embeddings` table.
Register the `create-embedding-for-post` task to your Trigger.dev cloud project by running the following command:
```bash theme={null}
npx trigger.dev@latest dev
```
In the Trigger.dev dashboard, you should now see the `create-embedding-for-post` task:
 You've successfully created a Trigger.dev task that will create an embedding for each post in your database. In the next step, you'll create an API endpoint that Sequin can deliver records to.
## Setup API route
You'll now create an API endpoint that will receive webhook sink payloads from Sequin and then trigger the `create-embedding-for-post` task.
This guide covers how to setup an API endpoint using the Next.js App Router. You can find examples for Next.js Server Actions and Pages Router in the [Trigger.dev documentation](https://trigger.dev/docs/guides/frameworks/nextjs).
Add a route handler by creating a new `route.ts` file in a `/app/api/create-embedding-for-post` directory:
```ts app/api/create-embedding-for-post/route.ts theme={null}
import type { createEmbeddingForPost } from "@/trigger/create-embedding-for-post";
import { tasks } from "@trigger.dev/sdk/v3";
import { NextResponse } from "next/server";
export async function POST(req: Request) {
const authHeader = req.headers.get('authorization');
if (!authHeader || authHeader !== `Bearer ${process.env.SEQUIN_WEBHOOK_SECRET}`) {
return NextResponse.json({ error: 'Unauthorized' }, { status: 401 });
}
const payload = await req.json();
const handle = await tasks.trigger(
"create-embedding-for-post",
payload
);
return NextResponse.json(handle);
}
```
This route handler will receive records from Sequin, parse them, and then trigger the `create-embedding-for-post` task.
You'll need to set four secret keys in a `.env.local` file:
```bash theme={null}
SEQUIN_WEBHOOK_SECRET=your-secret-key
TRIGGER_SECRET_KEY=secret-from-trigger-dev
OPENAI_API_KEY=sk-proj-asdfasdfasdf
DATABASE_URL=postgresql://
```
The `SEQUIN_WEBHOOK_SECRET` ensures that only Sequin can access your APIendpoint.
The `TRIGGER_SECRET_KEY` is used to authenticate requests to Trigger.dev and can be found in the **API keys** tab of the Trigger.dev dashboard.
The `OPENAI_API_KEY` and `DATABASE_URL` are used to create an embedding using OpenAI and connect to your database. Be sure to add these as [environment variables](https://trigger.dev/docs/deploy-environment-variables) in Trigger.dev as well.
You've successfully created an API endpoint that can receive record payloads from Sequin and trigger a Trigger.dev task. In the next step, you'll setup Sequin to trigger the endpoint.
## Create a webhook sink
Create a webhook sink that captures changes to your database and sends a HTTP POST request to your local API endpoint:
Navigate to the "Sinks" tab, click the "Create Sink" button, and select "Webhook Sink".
Select the schemas and tables you want to capture changes from (i.e `public.posts` or `public`).
Add [filters](/docs/reference/filters) to the sink to control which database changes are sent to your webhook endpoint.
You can optionally indicate if you want your webhook endpoint to receive a [backfill](reference/backfills) of all or a portion of the table's existing data. Since you want to process all posts, select to backfill all data.
Under "Message grouping", leave the default option selected to ensure events for the same row are sent to your webhook endpoint in order.
Under "Webhook Sink configuration" leave the defaults:
* Leave the default value of `30000 ms` for "Request timeout" as this is more than enough time for your function to process the request
* Leave the default value of `1` for "Batch size" since you're just processing one post at a time
First, create a tunnel to your local endpoint:
1. In the Sequin console, open the "HTTP Endpoint" tab and click the "Create HTTP Endpoint" button
2. Enter a name for your endpoint (i.e. `local_endpoint`) and flip the "Use localhost" switch
3. Follow the instructions to [install the Sequin CLI](/docs/reference/cli/overview), then run:
```bash theme={null}
sequin tunnel --ports=3001:local_endpoint
```
4. Click "Add encryption header" and set the key to `Authorization` and the value to `Bearer SEQUIN_WEBHOOK_SECRET`
5. Click "Create HTTP Endpoint"
Then, under "HTTP Endpoint", select your `local_endpoint` and add the path to your API route (i.e. `/api/create-embedding-for-post`).
Give your sink a name (i.e. `posts_webhook_sink`) and click "Create Webhook Sink".
Your webhook sink is now created and ready to send events to your API endpoint.
## Test end-to-end
1. The Next.js app is running: `npm run dev`
2. The Trigger.dev dev server is running `npx trigger.dev@latest dev`
3. The Sequin tunnel is running: `sequin tunnel --ports=3001:local_endpoint`
```sql theme={null}
insert into
posts (title, body, author)
values
(
'The Future of AI',
'An insightful look into how artificial intelligence is shaping the future of technology and society.',
'Alice H Johnson'
);
```
In your local terminal, you should see a `200` response in your Next.js app:
```bash theme={null}
POST /api/create-embedding-for-post 200 in 262ms
```
Finally, in the Trigger.dev dashboard, navigate to the **Runs** tab and confirm that the task run completed successfully:
You've successfully created a Trigger.dev task that will create an embedding for each post in your database. In the next step, you'll create an API endpoint that Sequin can deliver records to.
## Setup API route
You'll now create an API endpoint that will receive webhook sink payloads from Sequin and then trigger the `create-embedding-for-post` task.
This guide covers how to setup an API endpoint using the Next.js App Router. You can find examples for Next.js Server Actions and Pages Router in the [Trigger.dev documentation](https://trigger.dev/docs/guides/frameworks/nextjs).
Add a route handler by creating a new `route.ts` file in a `/app/api/create-embedding-for-post` directory:
```ts app/api/create-embedding-for-post/route.ts theme={null}
import type { createEmbeddingForPost } from "@/trigger/create-embedding-for-post";
import { tasks } from "@trigger.dev/sdk/v3";
import { NextResponse } from "next/server";
export async function POST(req: Request) {
const authHeader = req.headers.get('authorization');
if (!authHeader || authHeader !== `Bearer ${process.env.SEQUIN_WEBHOOK_SECRET}`) {
return NextResponse.json({ error: 'Unauthorized' }, { status: 401 });
}
const payload = await req.json();
const handle = await tasks.trigger(
"create-embedding-for-post",
payload
);
return NextResponse.json(handle);
}
```
This route handler will receive records from Sequin, parse them, and then trigger the `create-embedding-for-post` task.
You'll need to set four secret keys in a `.env.local` file:
```bash theme={null}
SEQUIN_WEBHOOK_SECRET=your-secret-key
TRIGGER_SECRET_KEY=secret-from-trigger-dev
OPENAI_API_KEY=sk-proj-asdfasdfasdf
DATABASE_URL=postgresql://
```
The `SEQUIN_WEBHOOK_SECRET` ensures that only Sequin can access your APIendpoint.
The `TRIGGER_SECRET_KEY` is used to authenticate requests to Trigger.dev and can be found in the **API keys** tab of the Trigger.dev dashboard.
The `OPENAI_API_KEY` and `DATABASE_URL` are used to create an embedding using OpenAI and connect to your database. Be sure to add these as [environment variables](https://trigger.dev/docs/deploy-environment-variables) in Trigger.dev as well.
You've successfully created an API endpoint that can receive record payloads from Sequin and trigger a Trigger.dev task. In the next step, you'll setup Sequin to trigger the endpoint.
## Create a webhook sink
Create a webhook sink that captures changes to your database and sends a HTTP POST request to your local API endpoint:
Navigate to the "Sinks" tab, click the "Create Sink" button, and select "Webhook Sink".
Select the schemas and tables you want to capture changes from (i.e `public.posts` or `public`).
Add [filters](/docs/reference/filters) to the sink to control which database changes are sent to your webhook endpoint.
You can optionally indicate if you want your webhook endpoint to receive a [backfill](reference/backfills) of all or a portion of the table's existing data. Since you want to process all posts, select to backfill all data.
Under "Message grouping", leave the default option selected to ensure events for the same row are sent to your webhook endpoint in order.
Under "Webhook Sink configuration" leave the defaults:
* Leave the default value of `30000 ms` for "Request timeout" as this is more than enough time for your function to process the request
* Leave the default value of `1` for "Batch size" since you're just processing one post at a time
First, create a tunnel to your local endpoint:
1. In the Sequin console, open the "HTTP Endpoint" tab and click the "Create HTTP Endpoint" button
2. Enter a name for your endpoint (i.e. `local_endpoint`) and flip the "Use localhost" switch
3. Follow the instructions to [install the Sequin CLI](/docs/reference/cli/overview), then run:
```bash theme={null}
sequin tunnel --ports=3001:local_endpoint
```
4. Click "Add encryption header" and set the key to `Authorization` and the value to `Bearer SEQUIN_WEBHOOK_SECRET`
5. Click "Create HTTP Endpoint"
Then, under "HTTP Endpoint", select your `local_endpoint` and add the path to your API route (i.e. `/api/create-embedding-for-post`).
Give your sink a name (i.e. `posts_webhook_sink`) and click "Create Webhook Sink".
Your webhook sink is now created and ready to send events to your API endpoint.
## Test end-to-end
1. The Next.js app is running: `npm run dev`
2. The Trigger.dev dev server is running `npx trigger.dev@latest dev`
3. The Sequin tunnel is running: `sequin tunnel --ports=3001:local_endpoint`
```sql theme={null}
insert into
posts (title, body, author)
values
(
'The Future of AI',
'An insightful look into how artificial intelligence is shaping the future of technology and society.',
'Alice H Johnson'
);
```
In your local terminal, you should see a `200` response in your Next.js app:
```bash theme={null}
POST /api/create-embedding-for-post 200 in 262ms
```
Finally, in the Trigger.dev dashboard, navigate to the **Runs** tab and confirm that the task run completed successfully:
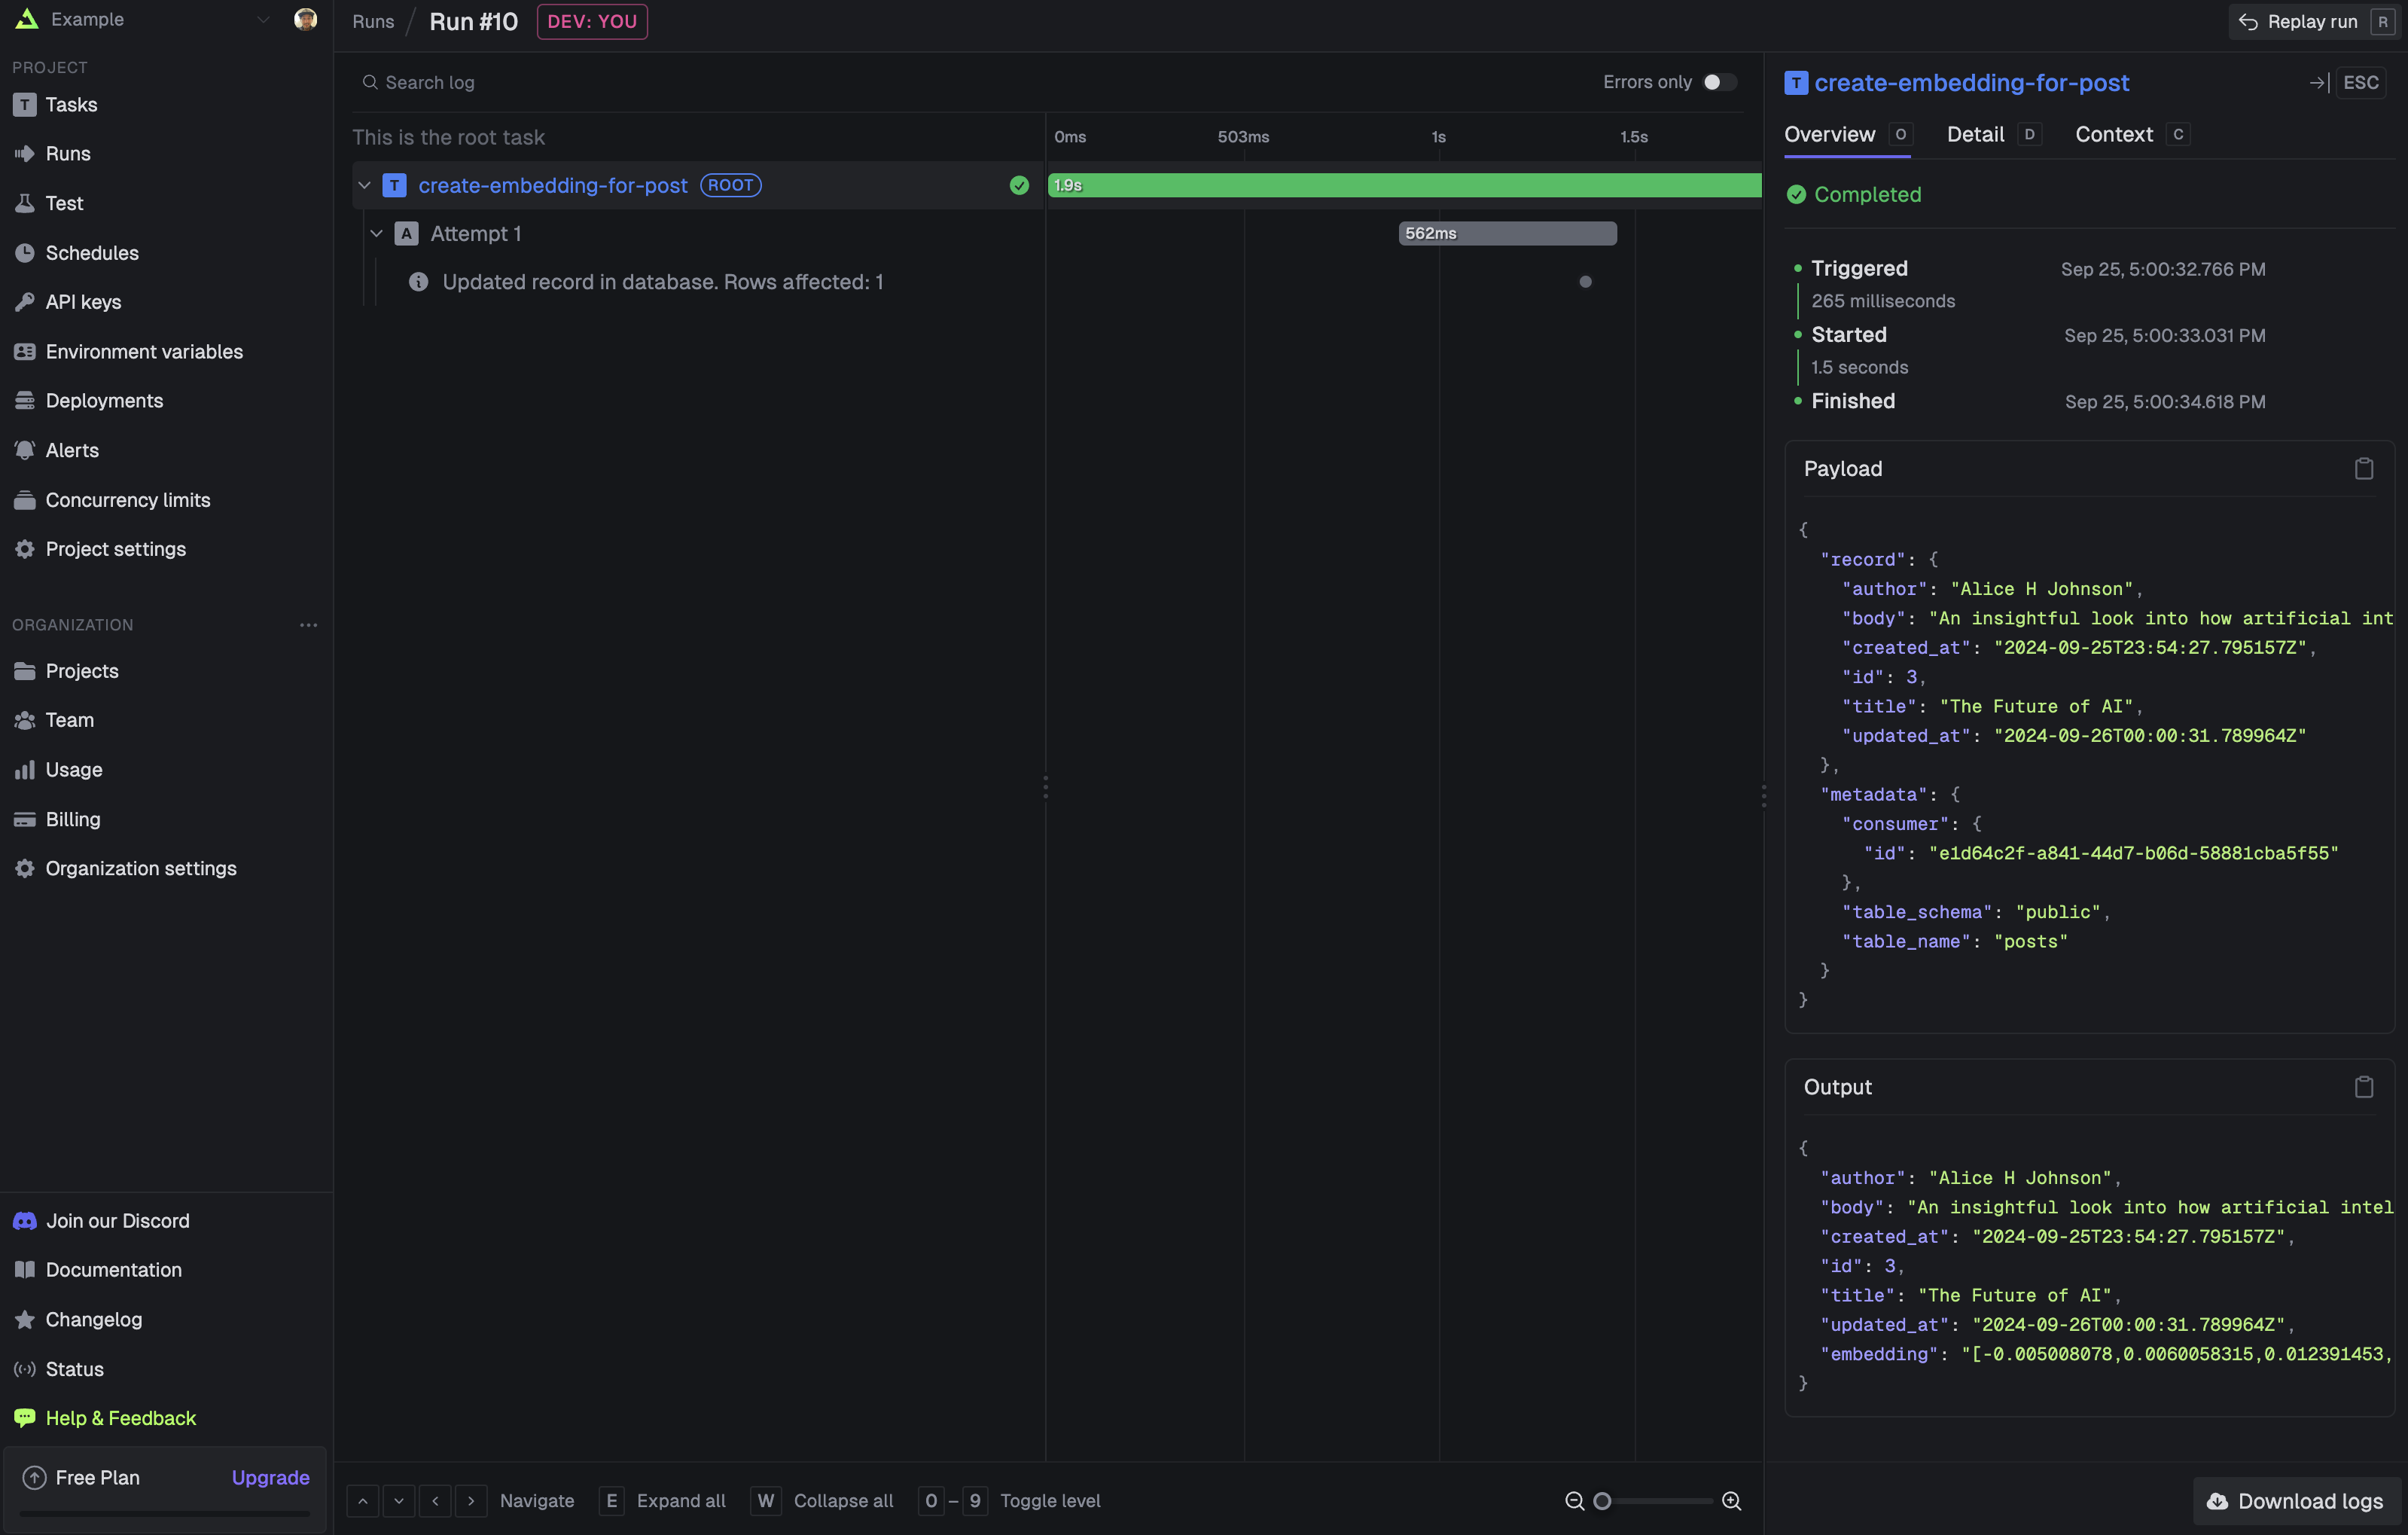 Every time a post is created or updated, Sequin will deliver the row payload to your API endpoint and Trigger.dev will run the `create-embedding-for-post` task.
## Next steps
With Sequin and Trigger.dev, every post in your database will now have an embedding. This is a simple example of how you can trigger long-running tasks on database changes.
From here, add error handling and deploy to production:
* Add [retries](https://trigger.dev/docs/errors-retrying) to your Trigger.dev task to ensure that any errors are captured and logged.
* Deploy to [production](https://trigger.dev/docs/guides/frameworks/nextjs#deploying-your-task-to-trigger-dev) and update your Sequin consumer to point to your production database and endpoint.
Every time a post is created or updated, Sequin will deliver the row payload to your API endpoint and Trigger.dev will run the `create-embedding-for-post` task.
## Next steps
With Sequin and Trigger.dev, every post in your database will now have an embedding. This is a simple example of how you can trigger long-running tasks on database changes.
From here, add error handling and deploy to production:
* Add [retries](https://trigger.dev/docs/errors-retrying) to your Trigger.dev task to ensure that any errors are captured and logged.
* Deploy to [production](https://trigger.dev/docs/guides/frameworks/nextjs#deploying-your-task-to-trigger-dev) and update your Sequin consumer to point to your production database and endpoint.