Webhooks are a convenient way for your users to subscribe to data changes in your application. But creating a robust webhook system that can reliably deliver every change, handle errors, and scale to millions of messages per day is not an easy task.

Sequin’s webhook sinks combined with Sequin’s Management API give you the tools to build a user-facing webhook system that is reliable and feature rich:

  • Capture and deliver every change that happens in Postgres to your users
  • Customizable filters so users can subscribe to only the data they care about
  • Backfill support so users can catch up on missed data
  • Automatic retries and backoff
  • Monitoring and alerting via Prometheus and Grafana

In this tutorial, you’ll build a simple Node.js application that allows users to subscribe to webhooks for their own data. You’ll use the Management API to dynamically create HTTP endpoints and webhook sinks that are specific to each user. You’ll also learn how backfills and transforms can be used to enable more complex use cases. Then, you’ll see how you can monitor the health of the system using Prometheus and Grafana.

Prerequisites

Retrieve your API token

To interact with the Management API, you’ll need an API token:

1

Log in to the Sequin console

With Sequin running, log in to the Sequin console at https://localhost:7376.

2

Navigate to the accounts page

Click the “Settings” gear icon in the bottom left corner and select “Manage Account”.

3

Copy your API key

In the API tokens section, copy the API token to your clipboard.

Setup your database tables

In the Postgres database connected to Sequin, create a table containing data you want to send to users. For this tutorial, we’ll work with a simple schema with three tables:

  • users: The list of users that can subscribe to webhooks.
  • notifications: Notifications that are sent to users. This is an example of the kinds of data you might want to send to users.
  • webhook_subscriptions: This table tracks the webhook subscriptions for each user. In this case, it’ll store the webhook URL and the Sequin sink ID for each subscription.
-- Create users table
CREATE TABLE users (
id SERIAL PRIMARY KEY,
name TEXT NOT NULL
);

-- Create notifications table (each notification belongs to a user)
CREATE TABLE notifications (
id SERIAL PRIMARY KEY,
user_id INT REFERENCES users(id) ON DELETE CASCADE,
message TEXT NOT NULL,
created_at TIMESTAMPTZ DEFAULT now()
);

-- Create webhook_subscriptions table (tracks user webhooks)
CREATE TABLE webhook_subscriptions (
id SERIAL PRIMARY KEY,
user_id INT REFERENCES users(id) ON DELETE CASCADE,
endpoint TEXT NOT NULL,           -- the webhook URL
sequin_sink_id UUID NOT NULL,     -- ID of the Sequin sink for this subscription
created_at TIMESTAMPTZ DEFAULT now()
);

Now, insert a user to work with:

INSERT INTO users (name) VALUES ('Paul');

Build the webhook subscription system

With the infrastructure in place, you’ll build a Node.js application that exposes an endpoint to create a webhook subscription for a user. You’ll use Express for the webserver, node-postgres (pg) to connect to the database you just configured, and Axios to interact with the Management API.

1

Initialize the project

  1. Create a new directory for the project and navigate into it:
mkdir user-webhooks
cd user-webhooks
  1. Initialize the project with Express:
npm init -y
npm install --save express pg axios
  1. Create a new file called server.js:
touch server.js
2

Write the server code

Add the following code to the server.js file:

server.js
const express = require("express");
const axios = require("axios");
const { Pool } = require("pg");

const app = express();
app.use(express.json()); // Enable JSON body parsing

// Configuration – replace with your actual API token:
const SEQUIN_API_TOKEN = "YOUR_API_TOKEN_HERE"; // (e.g., the token you copied from the console)
const SEQUIN_API_BASE = "http://localhost:7376/api";
const PORT = 3333; // Port number for the Express server

// Postgres connection to your local database
const dbPool = new Pool({
    connectionString: "postgres://postgres:postgres@localhost:5432/postgres", // Replace with your database connection string
});

// Endpoint to subscribe a user to webhook notifications
app.post("/subscribe", async (req, res) => {
    const { userId, webhookUrl } = req.body;
    if (!userId || !webhookUrl) {
        return res.status(400).json({ error: "Missing userId or webhookUrl" });
    }
    try {
        // 1. Create a new HTTP endpoint in Sequin for the given webhook URL
        const endpointName = `user-${userId}-endpoint`;
        let endpointResp;
        try {
            endpointResp = await axios.post(
                `${SEQUIN_API_BASE}/destinations/http_endpoints`,
                {
                    name: endpointName,
                    url: webhookUrl,
                },
                {
                    headers: { Authorization: `Bearer ${SEQUIN_API_TOKEN}` },
                }
            );
        } catch (err) {
            if (err.response?.status === 401) {
                throw new Error('Invalid API token');
            } else if (err.response?.status === 400) {
                throw new Error(`Invalid request: ${err.response.data.message}`);
            } else {
                throw new Error(`Failed to create HTTP endpoint: ${err.message}`);
            }
        }

        if (!endpointResp?.data?.id) {
            throw new Error('Failed to get endpoint ID from response');
        }

        const endpointId = endpointResp.data.id;
        console.log(
            `Created HTTP endpoint (${endpointName}) with ID = ${endpointId}`
        );

        // 2. Create a new webhook sink for the notifications table, filtered to this user
        const sinkName = `user-${userId}-notifications`;
        let sinkResp;
        try {
            sinkResp = await axios.post(
                `${SEQUIN_API_BASE}/sinks`,
                {
                    name: sinkName,
                    status: "active",
                    database: "postgres", // source database name. Make sure this matches the name you provided in the Sequin console when you connected your database.
                    table: "public.notifications", // source table to watch. Note that Sequin requires the schema name in the table name.
                    filters: [
                        // filter to only stream this user's rows
                        {
                            column_name: "user_id",
                            operator: "=",
                            comparison_value: userId.toString(),
                        },
                    ],
                    destination: {
                        type: "webhook",
                        http_endpoint: endpointName, // reference the HTTP endpoint by name
                        http_endpoint_path: "",
                    },
                    // (By default, the sink will capture new inserts/updates/deletes in real-time)
                    actions: ["insert", "update", "delete"],
                },
                {
                    headers: { Authorization: `Bearer ${SEQUIN_API_TOKEN}` },
                }
            );
        } catch (err) {
            if (err.response?.status === 401) {
                throw new Error('Invalid API token');
            } else if (err.response?.status === 400) {
                throw new Error(`Invalid sink configuration: ${err.response.data.message}`);
            } else {
                throw new Error(`Failed to create sink: ${err.message}`);
            }
        }

        if (!sinkResp?.data?.id) {
            throw new Error('Failed to get sink ID from response');
        }

        const sinkId = sinkResp.data.id;
        console.log(`Created webhook sink (${sinkName}) with ID = ${sinkId}`);

        // 3. Save the subscription details in the database
        await dbPool.query(
            "INSERT INTO webhook_subscriptions(user_id, endpoint, sequin_sink_id) VALUES($1, $2, $3)",
            [userId, webhookUrl, sinkId]
        );

        res.json({ message: "Webhook subscription created", sinkId });
    } catch (err) {
        console.error(
            "Error creating subscription:",
            err.response?.data || err.message
        );
        return res
            .status(500)
            .json({ error: "Failed to create webhook subscription" });
    }
});

// Start the Express server
app.listen(PORT, () => {
    console.log(`Server listening on http://localhost:${PORT}`);
});

Stepping through this code:

  • You standup a simple Express app that can connect to your local postgres database and make requests to the Sequin Management API.
  • You define a /subscribe endpoint that allows a user to create a new webhook subscription by providing a webhook URL and a user ID.
    • The function calls the Management API to create a new HTTP endpoint using the webhook URL provided in the request.
    • Then it creates a new webhook sink for the notifications table, filtered to the provided user.
    • Finally, it saves the subscription details to your local postgres database.
3

Test your webhook subscription system

  1. Run the server:

    node server.js
    
  2. Create a test webhook URL to receive notifications. We suggest using webhook.site to easily inspect the incoming requests.

  3. In a new terminal, make a POST request to the /subscribe endpoint to create a new webhook subscription:

    curl -X POST http://localhost:3333/subscribe -H "Content-Type: application/json" -d '{"userId": 1, "webhookUrl": "<YOUR_WEBHOOK_URL>"}'
    
  4. In the terminal running your server, you should see the following output:

    Created HTTP endpoint (user-1-endpoint) with ID = <endpoint_id>
    Created webhook sink (user-1-notifications) with ID = <sink_id>
    

    You can confirm that the subscription was created by checking your webhook_subscriptions table in postgres as well.

  5. Now, insert a new notification into the notifications table in your database:

    INSERT INTO notifications (user_id, message) VALUES (1, 'Hello from Sequin');
    
  6. You should see the notification appear in your test webhook:

    {
        "data": [
            {
            "record": {
                "created_at": "2025-04-22T00:26:11.975318Z",
                "id": 1,
                "message": "Hello from Sequin",
                "user_id": 1
            },
            "metadata": {
                "consumer": {
                "id": "4538acb2-8fb2-485f-885f-b0a0a8ad8e29",
                "name": "user-1-notifications"
                },
                "table_name": "notifications",
                "commit_timestamp": "2025-04-22T00:26:11.975318Z",
                "transaction_annotations": null,
                "table_schema": "public",
                "database_name": "local",
                "commit_lsn": 46346904
            },
            "action": "insert",
            "changes": null
            }
        ]
    }
    
  7. You’ll also see the message appear on the messages tab for the webhook sink in the Sequin console.

Advanced: Custom payloads and backfills

You now have a basic webhook subscription system that can capture and deliver every change to your users. But there are some additional features you can add to make the system more robust and flexible.

Custom payloads

Using transforms you can define the exact data payload delivered to your users. For example, you probably don’t need to deliver all the metadata about the notification, just the notification data itself.

1

Navigate to the transforms page

In the Sequin console, navigate to the “Transforms” page and click to create a new transform.

2

Define your transform

Give your transform a name, select Function transform as the type, and enter a description if you’d like.

Now define the transform function. In this case, to just deliver the message field, you can use the following function:

def transform(action, record, changes, metadata) do
    %{
        message: record["message"],
    }
end

Click Create transform to save your transform.

3

Add the transform to your webhook sink

On the webhook sink configuration page, click the Edit button and in the Transform section select the transform you just created.

In the future, you can update your server.js code to add this transform to the webhook sink automatically by adding the transform key to the body of your create sink request:

{
name: sinkName,
status: "active",
database: "local",
transform: "webhook_transform",
table: "notifications",
filters: [ ... ],
destination: {
  type: "webhook",
  http_endpoint: endpointName,
  http_endpoint_path: "",
},
actions: ["insert", "update", "delete"],
}
4

Test your custom payload

Insert a new notification in your database:

INSERT INTO notifications (user_id, message) VALUES (1, 'Is this just a message?');

You should see the following output in your test webhook URL:

{
 "data": [
     {
     "message": "Is this just a message?"
     }
 ]
}

Backfills

Backfills are a powerful feature that allows you to replay data for a user on demand. This is useful in several scenarios:

  • When first initializing a webhook subscription, to send historical data to the user
  • If a user temporarily loses connectivity and misses some webhook events
  • When developers need to re-sync or debug webhook data delivery
1

Create a `/backfill` endpoint

In your server.js file, add a new /backfill endpoint that makes a POST request to the Sequin Management API to start a backfill:

server.js
// Endpoint to start a backfill for a webhook sink
app.post("/backfill", async (req, res) => {
    const { sinkName } = req.body;
    if (!sinkName) {
        return res.status(400).json({ error: "Missing sinkName parameter" });
    }

    try {
        // Make a POST request to the Sequin Management API to start a backfill
        const backfillResp = await axios.post(
            `${SEQUIN_API_BASE}/sinks/${sinkName}/backfills`,
            {},
            {
                headers: { Authorization: `Bearer ${SEQUIN_API_TOKEN}` },
            }
        );

        res.json({
            message: "Backfill started successfully",
            backfillId: backfillResp.data.id,
            state: backfillResp.data.state,
        });
    } catch (err) {
        console.error(
            "Error starting backfill:",
            err.response?.data || err.message
        );
        return res.status(500).json({ error: "Failed to start backfill" });
    }
});

This endpoint takes in the name of the webhook sink you want to backfill and makes a POST request to the Sequin Management API to start a backfill.

2

Test your backfill

Make a POST request to the /backfill endpoint to start a backfill:

curl -X POST http://localhost:3333/backfill -H "Content-Type: application/json" -d '{"sinkName": "user-1-notifications"}'

You should see all the messages in the notifications table appear in your test webhook URL.

The Management API also provides a way to monitor the status of a backfill so you can show users the status of their backfill and notify them when it’s complete.

Monitoring and alerting

With your webhook subscription system in place, you can monitor the health of the system using Prometheus and Grafana.

Sequin comes with a pre-configured Grafana instance that you can access at http://localhost:3000. If you log in with the default credentials, you’ll see a dashboard with a few graphs to help you monitor your webhook sinks and backfills:

You can also ingest these metrics directly from Sequin’s 
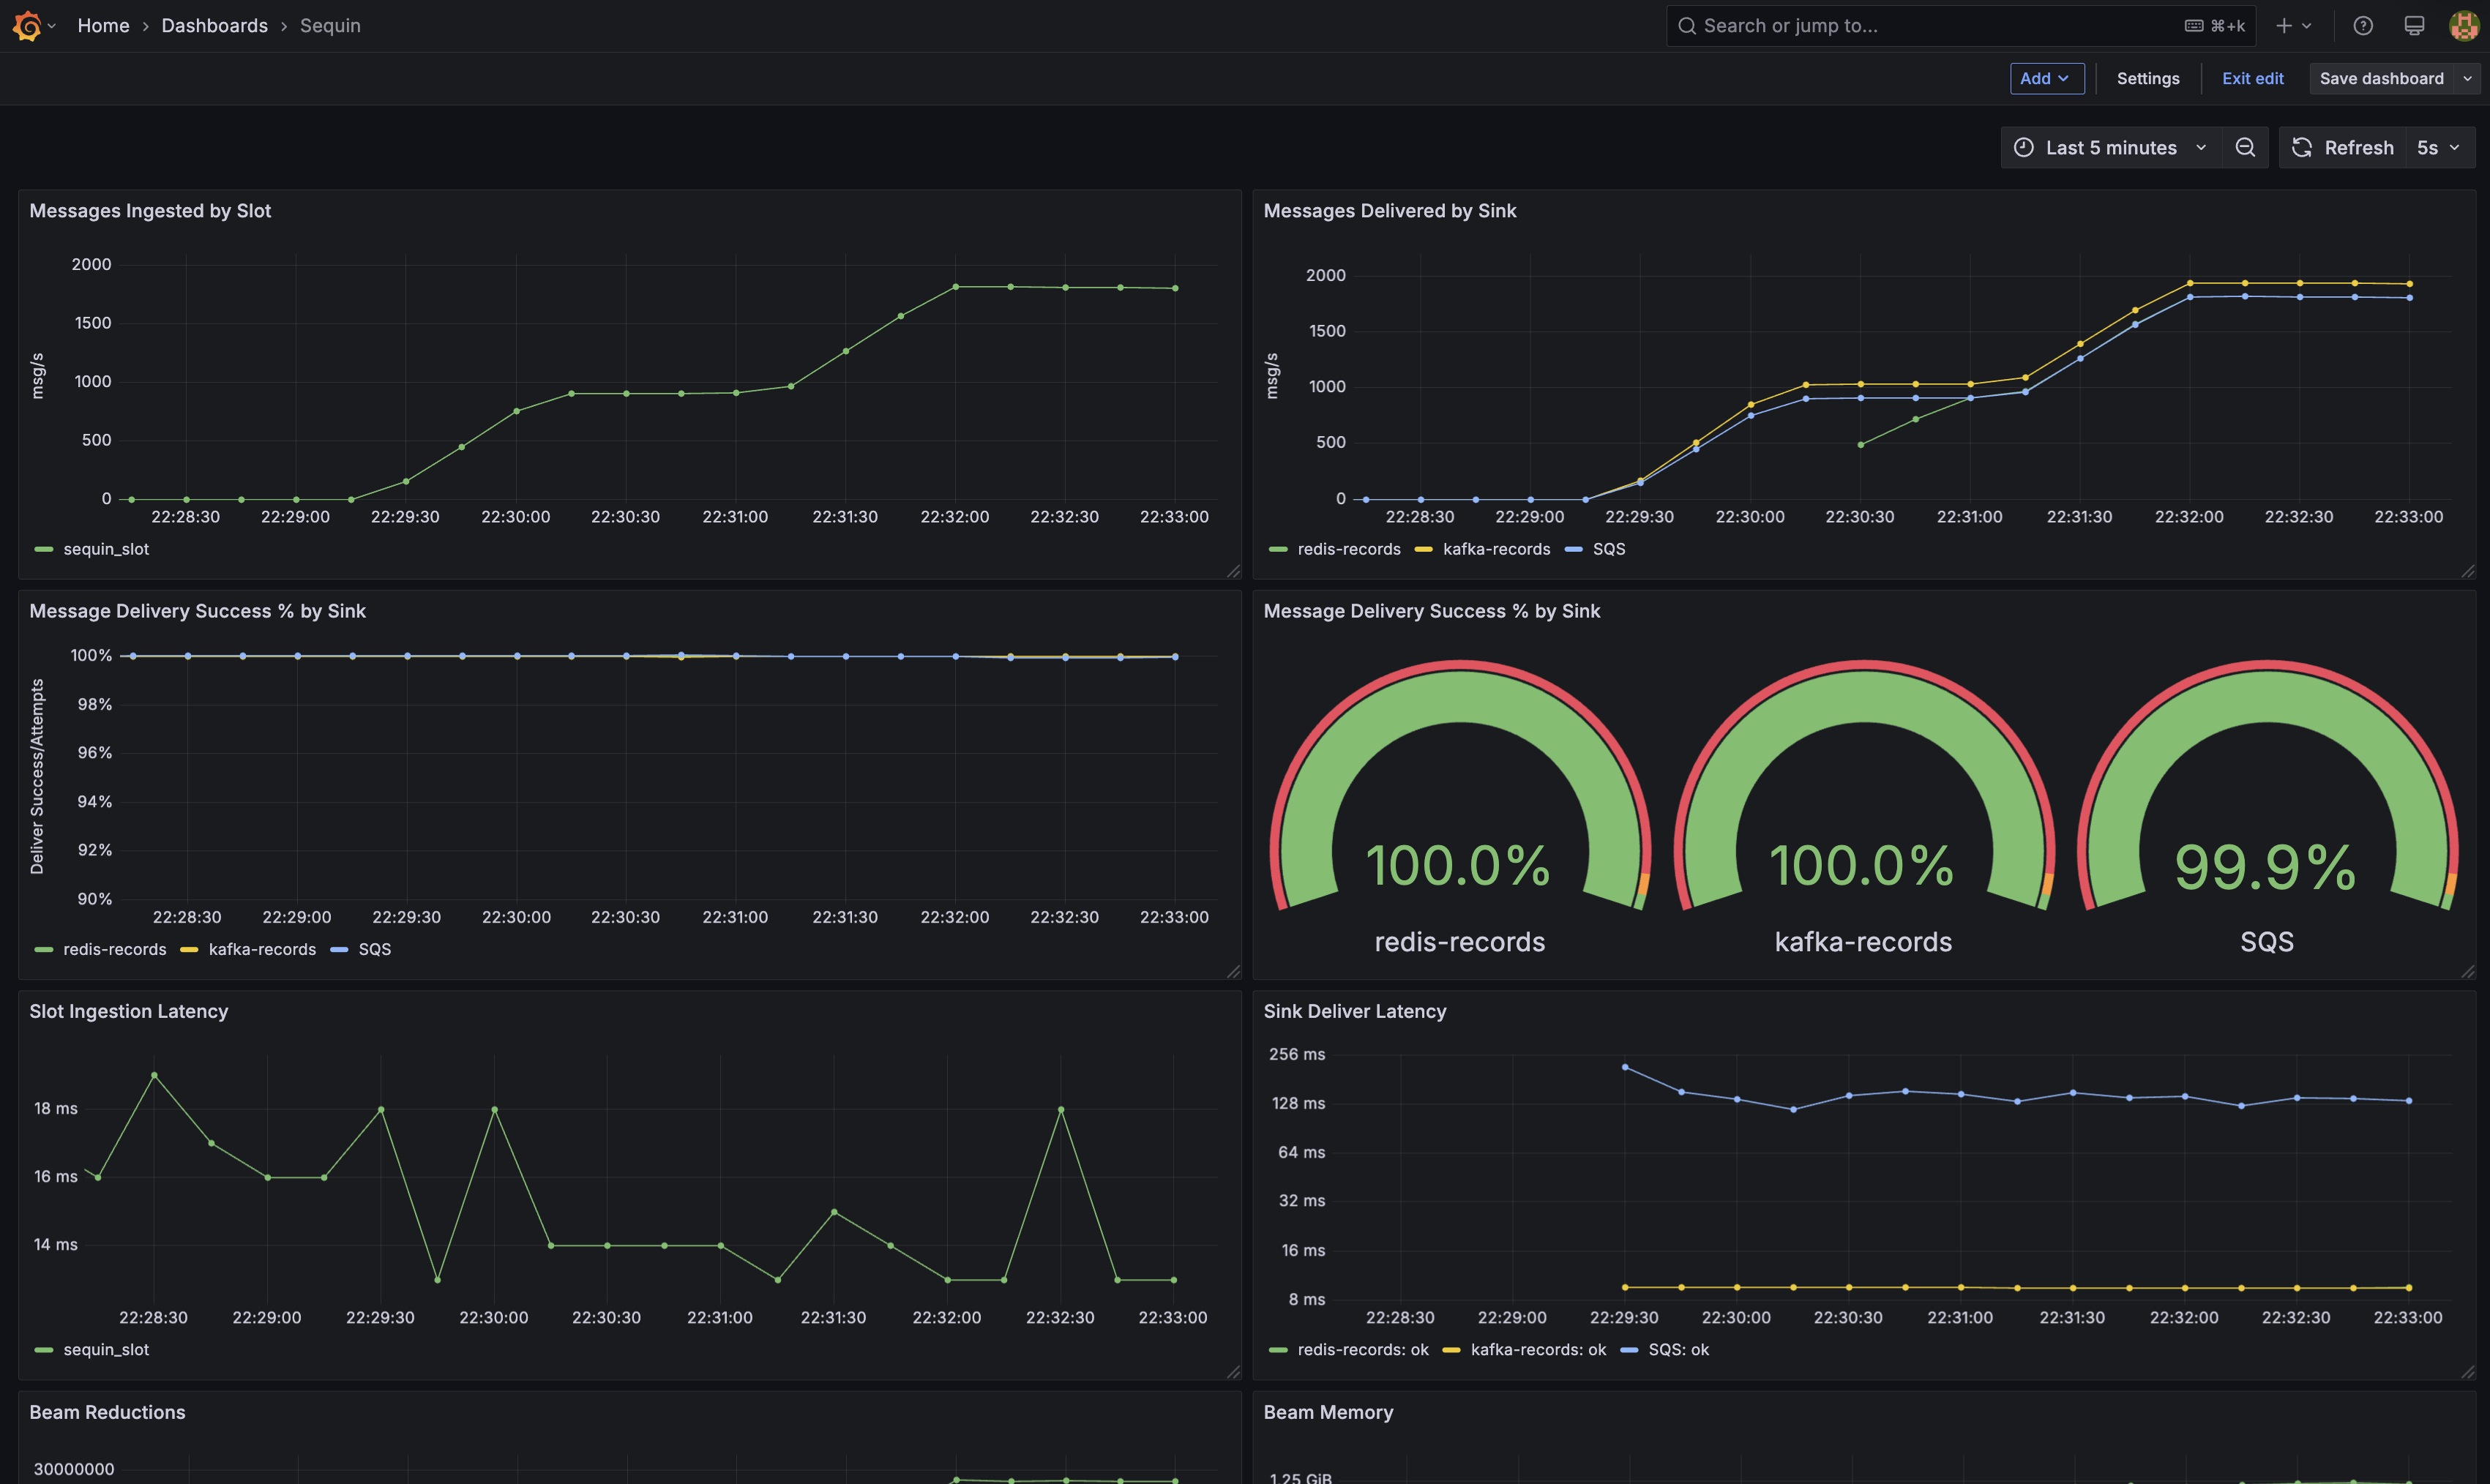
/metrics endpoint (on port 8376) to monitor Sequin in your tooling.

Resources

You now have a working proof-of-concept for a user-specific webhook subscription system. To take this to production, dig into the following resources: